Let’s see how you can reduce CPU temperature while gaming. Has your PC ever crashed while gaming? This can be caused due to multiple issues. But the most common reason is heating. Your CPU gets too hot and this harmful temperature makes the CPU shut down.
Thermal throttling is a safety system present in all CPUs which helps to shut down the CPU when it goes beyond a certain temperature limit. This thermal throttling system sometimes holds back the power of your CPU so it does not use its full potential. This helps your PC to maintain a good temp. Obviously, this makes your CPU run slower than usual.
This slow performance of the PC leads to several system crashes. Using your PC components and ignoring their safety measures can even decline your warranty. But the worst is you damage your precious components due to lack of knowledge. Too much heat in the CPU can damage the rendering motherboard and CPU sockets.
We know, all this makes us even more worried but don’t worry because we are here to tell you how you can reduce the heating problem with some easy steps and methods.
Methods To Reduce CPU Temperature While Gaming
Before knowing this, let’s know what will happen if your CPU goes beyond the limit and what is too much temperature for the CPU.
What Can Happen If Your CPU Goes Beyond Limit?
In several cases, the latest PC models automatically shut down when it goes beyond the limit. Know what your manufacturer has said about the product’s temperature limits. Such failsafe makes sure your PC and you are safe from any hazard that the thermal can cause.
Even with such features, the CPU will still suffer from consequences. High temp can slow down the performance slightly after months. Not just the CPU but also the motherboard can get damaged because of this. This can also reduce the life of your PC. If the high temperature is constant, your component will be permanently damaged.
What Is Too Much Temperature For CPU?
The answer is not simple. Everything depends on different scenarios and the placement of your system can also change the answer. Knowing about your cooling system and how many fans are working is very essential.
A usual gaming rig can be seen between 70-degree celsius and 80-degree celsius while gaming or with strong use. But installing a good cooling system can bring these figures down significantly. If you get a figure below 50 degrees Celsius, your CPU will live for years. There is plenty of softwares that you can use to analyze your system.
Ways to Reduce CPU Temperature
Below are some ways that can help you in reducing CPU temperature.
1. Good Cable Sorting
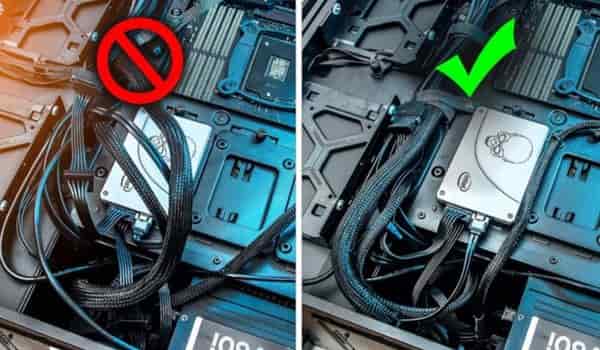
This cable management solution will not only help to maintain CPU temperature but also the general temperature inside your CPU. A bunch of messy cables hanging inside the cabinet will block free airflow ventilation. Let your cabinet breathe and see the magic.
2. Work On The Airflow

One of the simplest ways to ensure your CPU health is by having good airflow in the CPU. Obviously, open cases with airflow work like a beast, that’s why we are not talking about them. But for our usual CPU cabinets, you need to learn some basic configuration.
First, let’s talk about positive pressure. This pressure is the configuration that brings more amount of air into the CPU than the leaving amount. On the other hand, there is negative pressure, this is simply the opposite where incoming fresh cold air is less than the hot air getting out from the CPU.
So you can say this creates an air pocket which can help your system to run efficiently. But to control such pressures, you need access to every single fan. What you want to have is a neutral pressure which will balance the airflow. It will keep circulating the air instead of accumulating steam.
3. Clean The CPU
The only component that helps to bring the airflow is a fan. And if you want this fan to work properly, you will need to maintain it. Because fans pull air from outside, they also invite small debris and dust particles that can accumulate with time. And just like ordinary fans, your PC fans will get covered in dust making them slower.
And no matter how hard you try to clean your house your CPU from inside will still get dirty after a couple of weeks. The dust can cause fans to stop working and some other electrical issues. If you are a hardcore gamer who is going to do this after every few weeks then we recommend you purchase a compressor.
To clean the fan, remove the screws from your CPU cabinet. Carefully keep them aside so they don’t get lost. Now, remove the side or back panel with filters you can clean.
Get your compressed air can and start removing the dust. Make sure you do this outside in the open because you don’t want the dust to ruin your room. Don’t forget the fans. You can place the compressed air pipe in the fans to remove any dust from the blades.
The fan in the power supply is not in the open. But you can still try to clean it from the outside grill.
If you see any dust on the motherboard try to clean it as well. Do this after you have cleaned the fans. Carefully install the side panel and insert the screws as they were.
4. Replace The Thermal Paste

Cleaning and keeping the PC in the open air works well. But there are still some things you need to pay attention to. One of them is the thermal paste. You get pre-applied thermal paste on your CPU but with time and usage, it slowly loses its power. You have to replace the old paste with a new one.
The paste will help to keep your CPU cool in hard times. After long use, the paste slowly becomes dry and gets some cracks. Also, the paste loses its life the more you use it. Life also depends on product quality. Purchasing a branded product with a bit more budget can help. Usually, 1 year is the usual amount of time these paste last. But, this depends on the usage and company.
If you remove the cooler from the CPU, you can replace the thermal paste. If you haven’t done this before please check out our article on how to apply thermal paste and how it works.
5. Closed Case And Open Case
Gamers debate this topic on a daily basis. Which type of case is better for best temperature control? The answer seems easy. Open-air cases will obviously bring in more air meaning they keep everything cooler. But, in reality, open-air cases bring in more problems than air. To Be honest, they look stylish and cool when you keep them in the right way.
But the problem is your fans will bring in more dust than ever before with open-air cases. This will make you clean your PC every now and then. Also, damage from accidental spills or pet hazards has removed the open-air cases from the game.
6. Get More Fans
Check how many fans your CPU has, if the number is 3 or below then you might want to add a couple more to get the best results. We saw how important airflow is in a system and more fans help to get that neutral airflow. More fans will work better but you will have to keep them clean for their best performance.
7. Get A Better CPU Cooler
The coolers that come with the CPU are okay and work well. But you can’t rely on them for CPU temp control. You can go ahead and purchase an aftermarket CPU cooling. They will work 10x times better than the usual CPU coolers. And you can purchase them according to your budget. Even though cheaper ones have some issues they still work well.
If you usually overclock your CPU, you can try out the ROG RYUJIN II 360 which is good on a budget and amazing in performance. AIO (all-in-one) Coolers are amazing and work smoothly with your system. If you get one with water cooling then you have hit the gem. Their installation process is quite simple and can be done by simple research or online video or blog.
8. Fully Or Semi Modular PSU
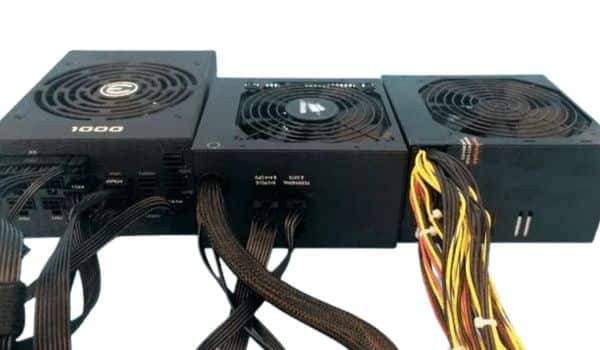
As we discussed above, cable management plays an important part when it comes to airflow. To help yourself a little bit more, you can try going for a fully or semi-modular PSU. Both will help you get a better airflow system and help your fans a bit. There are best PSUs for gaming available in the market.
9. Boosting Fan Speed From Motherboard BIOS
You have the ability to manually change fan speed from the BIOS (Basic input and output system). This works well to keep your CPU at a cooler temperature. The default setting keeps the fan speed at auto but you can change the profile settings to get more performance for a better effect. Initially, the motherboard operates the fans well but for better cooling, you can change some settings even though it will make your PC a bit louder.
The airflow will be much better and your components will stay cool for longer. But the obvious drawback of this is that the lifespan of your fans will decrease significantly. You can try to keep the settings a bit steady for stable performance.
The upcoming steps might look a bit complex and scary but once you do this you will realize how simple it was. Going into the BIOS of a motherboard will seem like a new world, but with practice, you’ll become a master in no time.
CAUTION: Wrong steps will lead to some issues. You might lose your PC.
Just follow the steps and don’t do anything else. Each motherboard is different but you can check the manual which can help you open the “Easy Mode Section.”
Changing BIOS Setting For High Fan Speed
Let us see how you can change the setting manually to control your fan speed to reduce CPU temperature while gaming.
The default setting is set on Auto. The profile curve is designed to keep noise at a minimum while giving good performance. So, you can say your motherboard control the speed is a bit safe and smart. But we are going to see how you can change this curve setting. The noise won’t be a problem for gamers who wear headphones.
But remember this will drag down the age of your fans. If your PC already makes a lot of noise, you can change the setting manually to get balanced performance and noise.
- At the post, press the DEL key to enter the BIOS motherboard settings.
- Enter the settings of your fan-controlling software. Our software is Smart Fan 5.
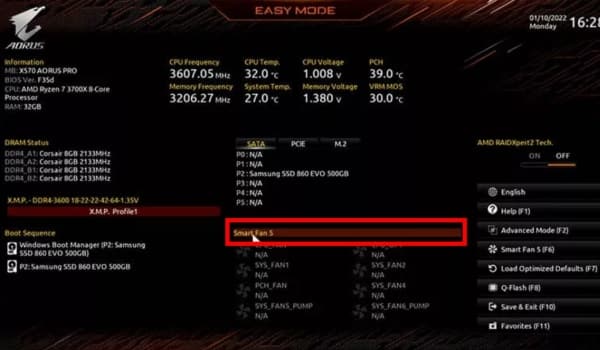
- Keep the CPU fan speed control set manually.
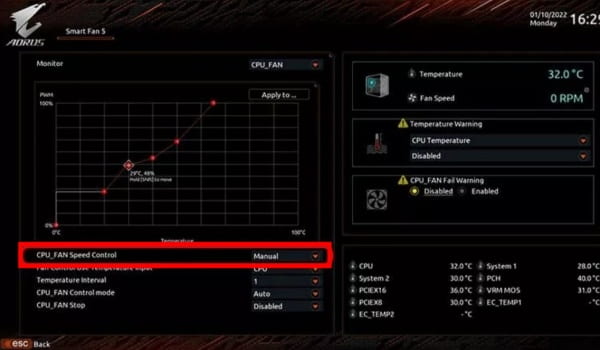
- You will see a graph, change the dots to control the speed.
- You can keep it on at 50% which will keep everything cool but while gaming, you can push these settings for better cooling. Just wear headphones to avoid the fan noise.
- Save the settings and exit.
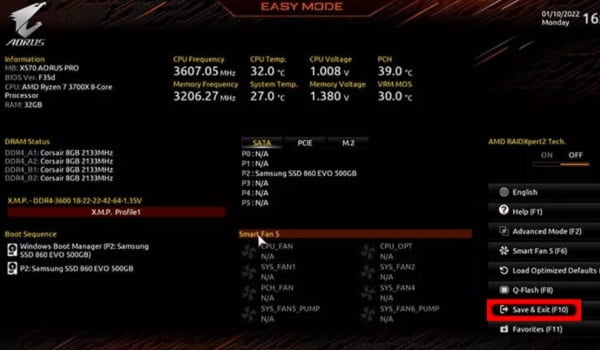
- That’s it, you are done and now you can enjoy loud noise with better cooling.
How Can You Change The CPU Temperature Limit?
Before you go ahead and change the limit settings remember the companies give your CPU limits because going beyond limits can damage your components. Just check the manufacturing manual and see what temperature is suitable for your CPU. Accordingly, use the components. Usually getting too much heat in the CPU will lead to random crashes and shutdown of the PC. This happens to protect your PC from getting damaged.
Using the CPU on max heat temperature will cause permanent damage making it slow and less efficient. You have the ability to overclock your CPU but never touch the temp limit settings. It is better to experience some crashes than to lose your CPU forever.
Gamers should invest in cooling systems so they can enjoy long-lasting gaming without meddling with any security settings. Water cooling is best to reduce CPU temperature while gaming. If you are unsure about anything, do ask for help from a friend or an expert in this field.
At What Temperature Is Your CPU At Risk?
The temperature limit on the CPU changes according to the type of your CPU. Each model has different limitations and accordingly needs to be used. But a round figure for any CPU is around 80-degree celsius or above. This temperature or above can damage your CPU in a short period of time.
Knowing that 100-degree celsius is the boiling point, you want to keep your CPU temp as away from this number as possible. The lower the number the better your components work in the long run. The temperature keeps changing according to what you are doing. If you are playing a high-end game the whole day, you will realize your CPU is working at a high temp.
Using a PC all day to watch Netflix will not raise the temp. The usual usage of a PC shows a temperature of around 35 degrees Celsius. If you get something around 50 degrees then you should consider following our above methods. This could be a serious issue so never take it lightly.
And if you are using your PC for something heavy like gaming or video rendering then your temperature should be around or below 65 degrees Celsius. Above this number, you are taking a huge risk of damaging your CPU.
Try to read the user manual to know exactly what temperature your CPU can handle. If your work is extreme please try using some cooling methods to keep your hardware safe.
Conclusion
A good gamer always tries to take care of his PC component. One of the most important ones is the CPU and maintaining its temperature matters a lot. The care you put in will help the PC to run longer with the same performance as the new one. You don’t want your CPU to produce smoke, do you? This applies to all the components present inside your CPU.
The cooler your PC is, the better it runs and the better it lives. So keeping an eye on your CPU temperature is all you need to take care of. If you don’t maintain your CPU temp, not only does your processor take the hit but the motherboard sockets have a high chance of getting damaged. This will turn into a costly repair. Just use some of the methods we told you to.
They will help you to keep your hardware live longer with no stress at all. Being lazy will drain your pockets eventually. If you want to see how you can maintain your GPU temperature while gaming then checks out our other blogs as well. So these were some of the best ways to reduce CPU temperature while gaming.