
You can use Windows built-in utilities like Backup and Restore and File History to backup Windows 11 to external drive. To complete this task, you can alternatively use professional Windows backup software. To learn more, keep reading.
Methods To Backup Windows 11 To External Drive
The “backup Windows 11 to external drive” application in the settings app appears to have been eliminated in Windows 11. What is the best way to backup Windows 11 to external drive? Or do you have a decent third-party program that can assist you in completing the task? Could you please share it with me?
Reddit.com Case Study
Regularly backing up your computer files to a secure storage source, such as an external hard drive, is a smart idea. This makes it simple to retrieve data in the event of a file loss or corruption. If you’d like to learn how to backup Windows 11 to external drive, follow the steps below.
You may backup Windows 11 to external drive using a variety of methods. You can backup Windows 11 with File History or Backup and Restore, two built-in backup utilities in Windows. Alternatively, professional Windows 11 backup software can be used to automatically transfer Windows 11 backup to external drive.
Let’s get down to business and figure out how to backup Windows 11 to an external hard drive.
Method 1: Using Backup and Restore
On Windows 11, you may use Backup and Restore to make backups of your computer files and folders, as well as create a system image for your PC. A system image is a copy of the discs that Windows needs to execute. Backups of files and folders are available in all editions of Windows, but only Professional, Business, and other high-end editions have access to the entire set of functions.
You can use Windows 11 Backup and Restore to backup Windows 11 to external drive by connecting your hard disc to the PC and following the procedures below:
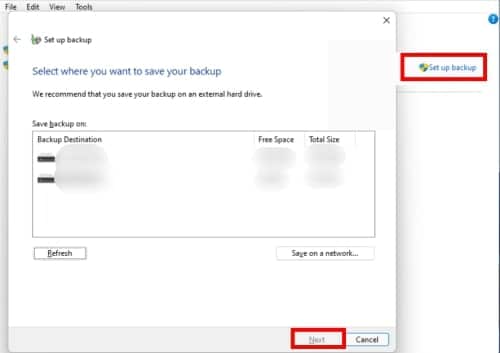
- Select Backup and Restore from the Control Panel (Windows 7) and then click on Set up Backup. Click Next after selecting the external hard drive where you want to save your Windows 11 files.
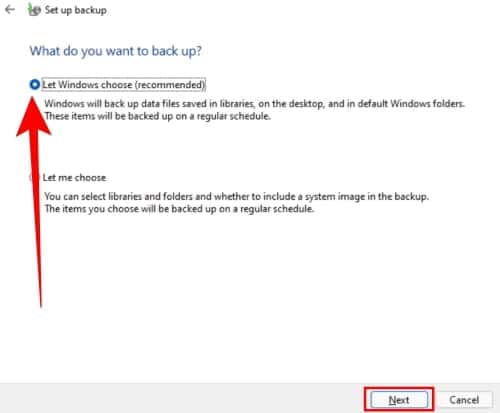
- Finally, select Let Windows Choose to proceed to the next step. Note: The Let Windows Choose option allows Windows to backup data stored in libraries, on the desktop, and in normal Windows directories.
After that, you can easily set up automatic backups of your Windows 11 data and run them.
File Backups Can Be Restored from Backups
If you have created backups of your files, you can recover them through Backup and Restore if your data is lost. Here’s how to do it:
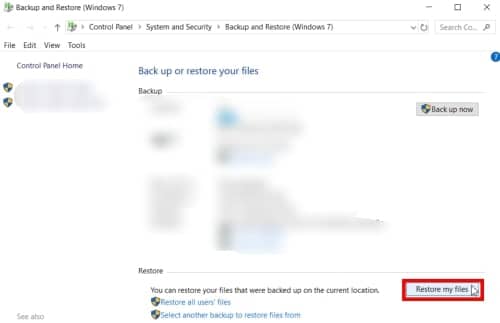
- As before, go to Control Panel and select Backup and Restore (Windows 7).
- Click the Restore my files button in the Restore section, locate the files you need to recover, and restore them to your laptop.
Method 2: Using File History
On Windows 11, File History can let you backup files in the Documents, Music, Pictures, Videos, and Desktop folders, as well as offline OneDrive files, to an external hard drive. However, it is critical to discover that File History is used to make a complete copy of the original files and folders. You can notice a lot of duplicates of the same file after several backups.
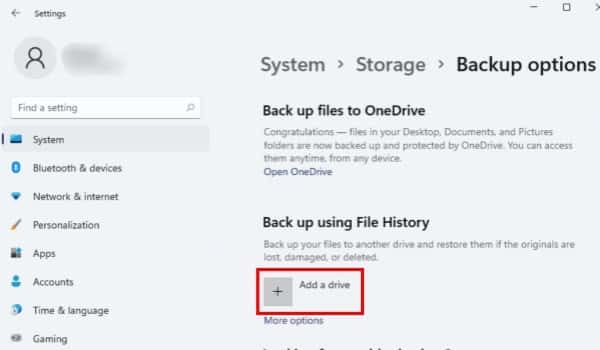
- Plug in an external drive to your computer and go to the Update & Security section of the Settings menu. Select Backup and then Add a Drive to save your external hard drive as a backup location. Then, if necessary, enable the Automatically back up my files option.
Note: You can select your backup modes and the files/folders that need to be backed up in the auto-backups by using the More options button.
Backups from File History can be Restored
Data backups can also be easily restored from an external drive using File History. Here are some comprehensive guides:
- On the File History screen, press the Restore personal files button and choose the backup version of the files you want to recover. Select Restore from the Settings menu to restore your files to a new location, or select Restore to recover data to its original location.

Method 3: Use a third-party tool
In addition to the two techniques mentioned above, you can backup Windows 11 to external drive using free Windows backup software, a very simple process. AOMEI Backupper comes highly recommended in this case.
This freeware is a PC backup and restore program that allows you to easily deploy Windows 11 auto backups. It allows you to back up your computer files to cloud storage, external hard drives, and network storage. Furthermore, you may easily sync and clone files from one source directory to another.
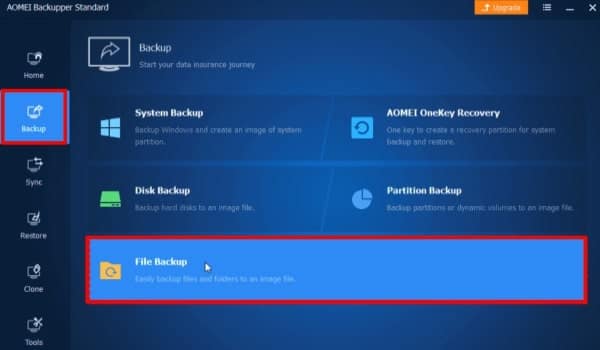
- Get AOMEI Backupper and install it. Then connect your device to the external drive. Launch this program and select the Backup tab from the left panel. Then click on File backup.
- Click Add Folder or Add File to find the files you want to back up on your computer.
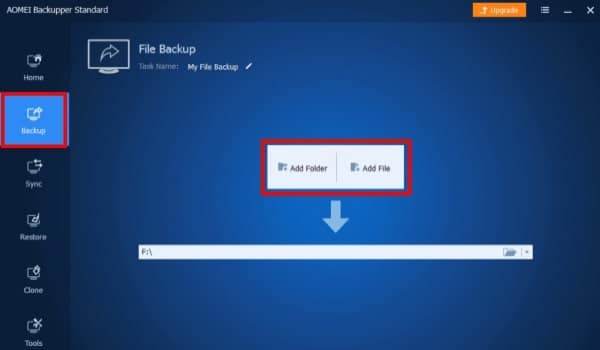
- Select an external hard drive connected to your computer as the backup location. Then press the Start Backup button.
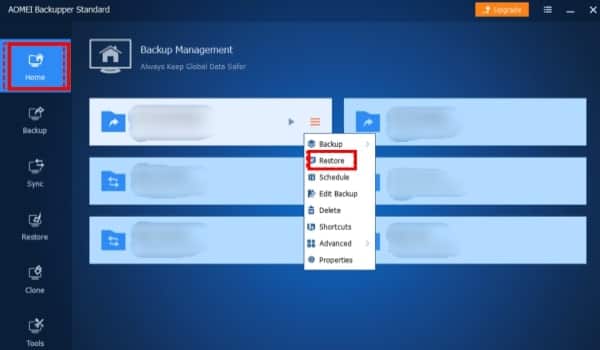
Backups from AOMEI Backupper can be restored
The following methods can be used to restore file backups created with AOMEI Backupper.
- Go to the Home tab and look for the backup task you want to restore. Right-click the task’s three-line button and choose Restore.
Cloud Backup
Aside from storing up your Windows 11 information on an external drive, backing up your computer files to a secure cloud helps protect your files from loss and hacking. OneDrive, Google Drive, and Dropbox are all major cloud storage providers.
Conclusion
This article discussed three methods to backup Windows 11 to external drive. You can select the most appropriate one to complete your backup work. We hope this article clarifies the simple backup and restore process in Windows 11.
Everyone loves it whenever people come togetherand share opinions Great site, keep it up!