In order to resolve the issue, we have compiled some fixes for the issue of black screen after Windows 11 update. Let’s go on to the guide now.
Microsoft did a fantastic job delivering Windows 11 with a modern design aesthetic and a wealth of incredible new features. However, Windows 11 continues to have a few fundamental Windows problems. After updating to Windows 11, users are now reporting that they are experiencing a blank screen. Some users claim that after logging in, and occasionally even before logging in, Windows 11 displays a black screen with a cursor.
Methods To Fix Black Screen After Windows 11 Update Issue
There are different ways to fix the black screen after Windows 11 update included in this article. Solutions are also added in case a black screen is appearing with a cursor on Windows 11 before or after login.
Method 1: Restart your PC
There’s nothing to worry about if Windows 11 is showing a black screen after Windows 11 update or while logging in. Sometimes, Windows requires time in order to load all the system components after a heavy update. If that is the case then you need to restart your Windows 11 PC and patiently wait for at least half an hour before trying any fix. You can move to the next step if you are still facing the issue of a black screen after the restart.
Method 2: Restart the Graphics driver
A secret keyboard shortcut in Windows 11 enables you to restart the graphics driver without visiting any settings. This will immediately fix the black screen problem if your computer is experiencing any graphics driver-related problems.
To restart the graphics driver in Windows 11, simply press the Windows + Ctrl + Shift + B keys simultaneously. Give your Windows 11 computer a minute, and the black screen ought to be gone.
Method 3: Startup Repair
On Windows 11, some users see a black screen prior to the login screen. It indicates that Windows is not loading properly and that there may be problems with the internal operating system. You are unable to restart Explorer or get to Task Manager in such circumstances. To solve this issue, you must launch Windows 11’s troubleshooter. Here’s how you can do it.
- Turn off your computer first. Turn it on now, then shut it down after Windows starts loading. Now start your computer, then switch it off once more. Repeat this two or three times to compel Windows to load its recovery screen. On some computers, pressing F2, F8, or F12 during boot also displays the Startup recovery screen.
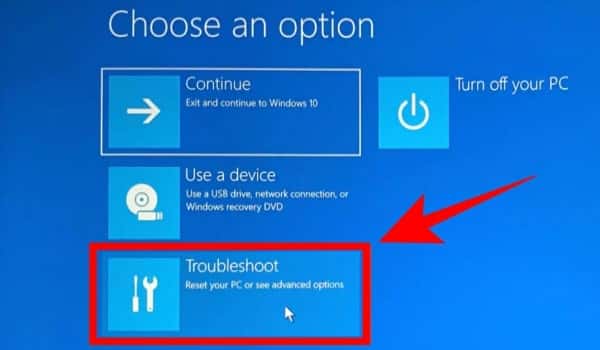
- After reaching the screen for recovery, select Advanced options.

- Next, click on Troubleshoot.
- Now, click on the Startup Repair option after reopening Advanced Options.
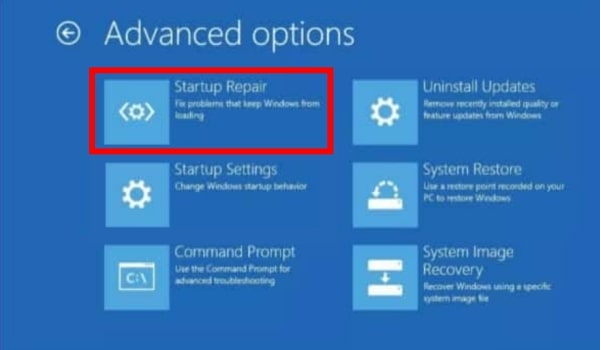
After restarting your computer, Windows will attempt to resolve the black screen problem on its own. Try the next method if this doesn’t work.
Method 4: Edit Explorer Shell Registry
Windows 11 usually displays a dark screen when the Explorer shell’s settings have been changed in the registry. The steps listed below can be used to undo these changes. This will solve your computer’s black screen problem and correctly load the Explorer shell.
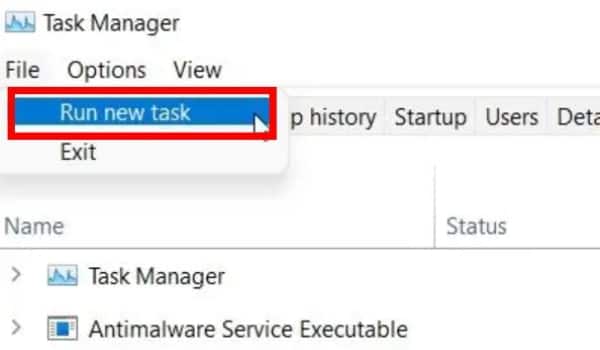
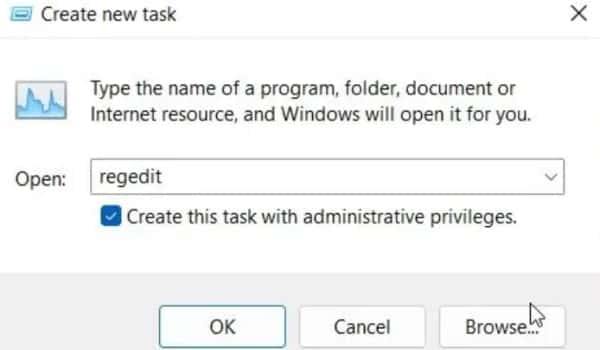
- Press Ctrl + Alt + Delete and open Task Manager if you have Windows 11 and facing a black screen with a cursor after logging in. Run a new task by opening File by clicking on it in the top menu bar.
- Now, type regedit into the textbox and activate the Create this task with administrator privileges checkbox. Now, press Enter.
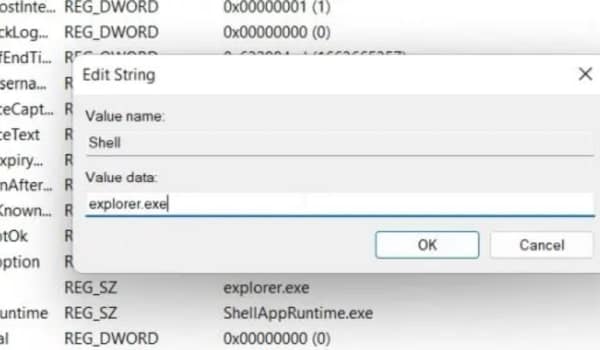
- After that, the Registry Editor will launch. Follow this path here:
HKEY_LOCAL_MACHINE\SOFTWARE\Microsoft\Windows NT\CurrentVersion\Winlogon
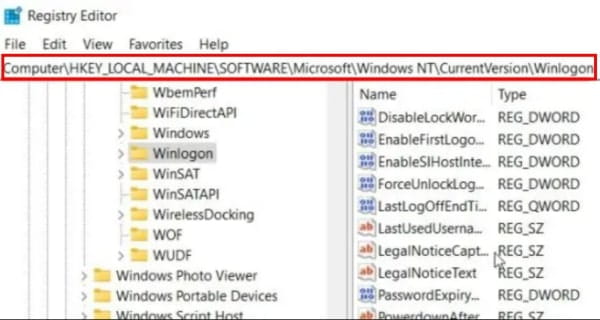
- Shell is located in the right pane. Make sure explorer.exe is present under Value data before you double-click to open it. Change the text if it isn’t there, then click OK.
Method 5: Boot into Safe Mode
If the previous fix didn’t work for you and you are still facing the problem of the black screen appearing on your Windows 11 PC before login, try to start Windows 11 in safe mode for solving this issue. Follow the below-given steps.
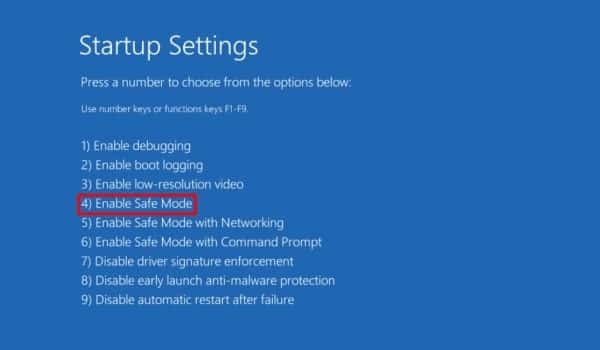
- You must proceed in the following order starting from the Recovery screen: Troubleshoot > Advanced options > Startup settings > Restart. Press the 4 or F4 key to start Windows 11 in safe mode.
- Simply restart the computer once you are in Safe mode. Sometimes, just booting into Safe mode solves the black screen issue in Windows 11. Now just check if everything is working fine and you can log in easily without any trouble. If not, move to the next step.
- Boot back to Safe mode and uninstall apps on Windows 11 which are creating issues. Occasionally, harmful programs prevent Windows 11 from properly loading its components, therefore get rid of those annoying programs you have no knowledge about.
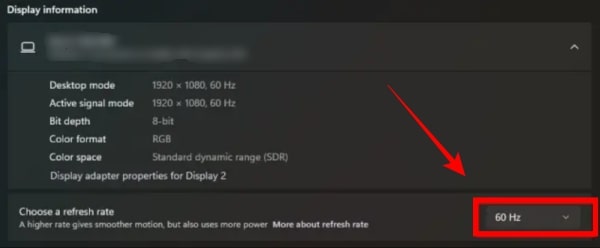
- You are also recommended to open Windows settings by tapping Windows + I. Here, navigate to System > Display > Advanced Display and change the refresh rate to 60Hz or 30Hz, according to the monitor’s specs. Now, restart your PC and check if the problem still persists.
In case of still facing this issue, boot back to the Safe mode screen and tap the F5 or 5 buttons to boot to Safe mode with the internet option. A wired Ethernet connection would be needed to use the internet in safe mode. Connect your smartphone via USB if you don’t have an Ethernet and use USB tethering.
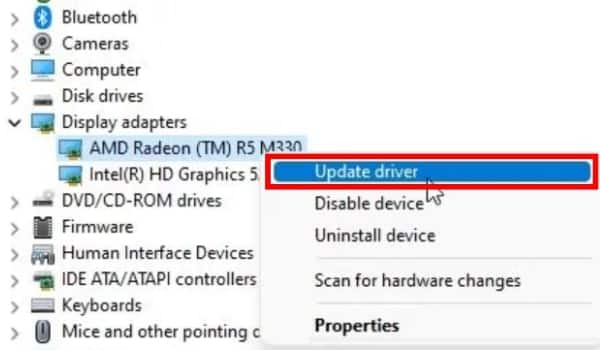
Start the Device Manager and update the graphics driver now that you have internet access in Safe mode. Restart your PC when the graphics driver has been updated, and you should not see any black screen errors this time.
Method 6: Restart Windows explorer
It might happen that due to some graphics or explorer issue, your Windows 11 is not being able to show you the desktop shell. Here’s what you can do for solving this issue.
- In order to open the advanced menu, press the Windows 11 keyboard shortcut Ctrl + Alt + Delete. Then, tap on Task manager. Now, tap on the File and then select the Run new task option.
- Next, you need to type explorer.exe in the text box and then hit Enter. This will remove the black screen and reload the explorer shell. However, if this fix does not work for you, you can move to the next method.

Method 7: System Restore
If you get a black screen after installing an unknown program or making significant changes, you can restore your system to a functioning state using System Restore. It is important to note that it will also undo all modifications you have made to your PC, including changes to files and folders. System Restore basically allows you to go back in time.
- By abruptly shutting down and restarting your computer, you can access the Windows 11 Recovery option. Open Advanced options > Troubleshoot > Advanced options > System Restore once you’re in the Recovery screen.
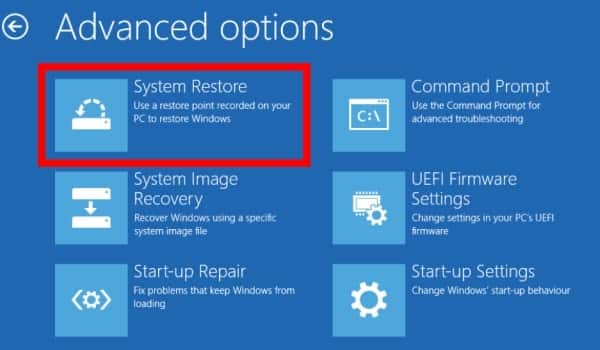
- Follow the on-screen prompts to select a restore point. Your computer will restart, and the black screen problem should be resolved. This process might take a while so keep patience.
Method 8: Uninstall Last Update
If a black screen after Windows 11 update is displayed, it could be due to the latest update, which may have damaged some system components. In that case, uninstall the most recent update. Follow the steps below for in-depth instructions.
- To uninstall the most recent update on Windows 11, we must force-open the recovery menu. Restart your computer and shut it off when the Windows logo appears. Repeat this method 2-3 times, and the Recovery screen will display.
- Now, click on Advanced settings > Troubleshoot > Advanced options > Uninstall updates.
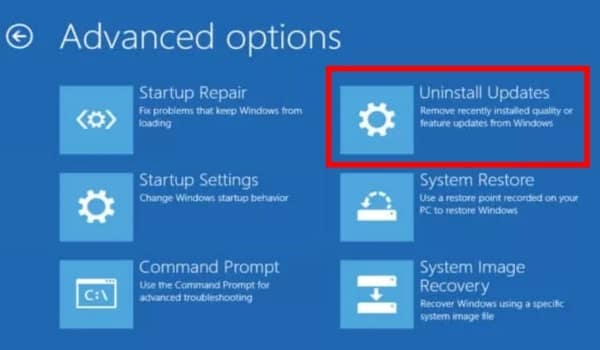
There are two options here: quality update and feature update. Quality updates are more frequent and smaller in size, whereas feature updates are larger and, come twice a year. If you are unsure which update caused the black screen, click Uninstall latest quality update and see if it resolves the problem.
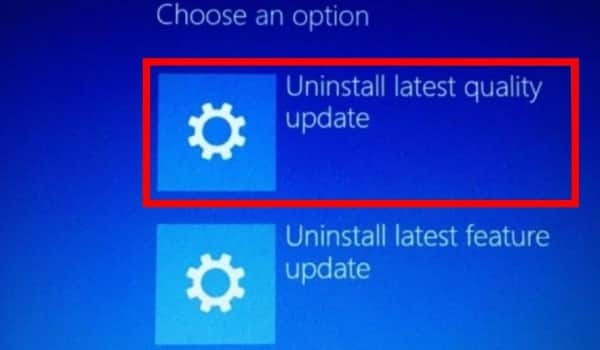
If that doesn’t work, click Uninstall latest feature update and wait an hour. Once the operation completes, your PC will restart. Now, check if the black screen issue has been solved or not.
Method 9: Reset the PC
If none of the solutions above were successful in resolving the black screen after Windows 11 update problem, you will need to reset your Windows 11 PC. This will completely reset your Windows 11 PC and will undoubtedly resolve the black screen issue. Don’t worry; except for the data on the C drive, all of your files and folders from other drives will not be deleted (Desktop, Documents, Downloads, and more). However, all installed programs will be removed.
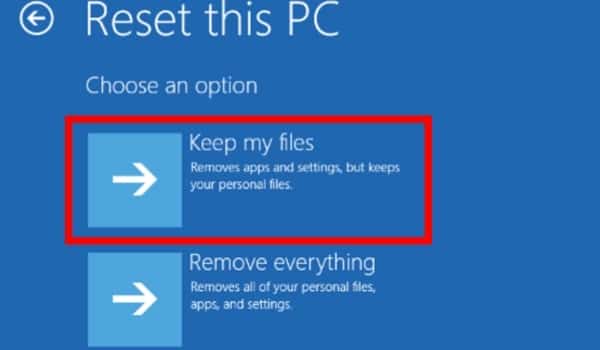
- Click Advanced options > Troubleshoot > Reset this PC on the recovery screen.
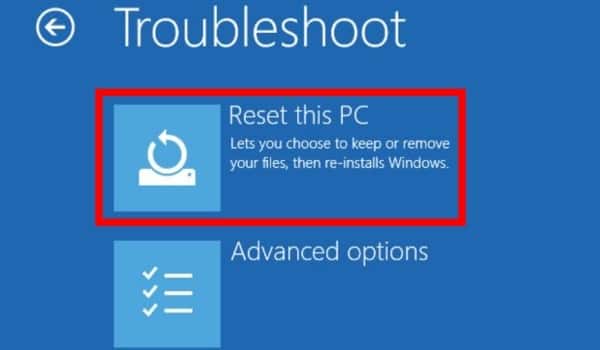
- After that, select Keep my files. It will now reinstall Windows 11 on your computer, and the black screen problem will be resolved.