Some users who updated from Windows 10 to Windows 11 are experiencing disk errors on Windows 11 with Microsoft’s brand-new desktop operating system. Some people are unable to log into their PCs even after running a disc cleanup on Windows 11 and removing the cache. Do not panic if you are experiencing disk errors on Windows 11 and are in the same situation. This post includes seven techniques for fixing disk errors on Windows 11. Everything has been addressed, including the CHKDSK scan and the disc check for system faults. So let’s get to the guide right away without more delay.
Fixes To Repair Disk Errors On Windows 11
In this post, we’ve covered seven techniques for fixing disk errors on Windows 11. Disk faults can occur seldom for some users, while for others, “repairing disc errors” will show on their screen and lock them out of their PCs. We have included answers for every type of disc issue here, therefore we advise you to read through every area.
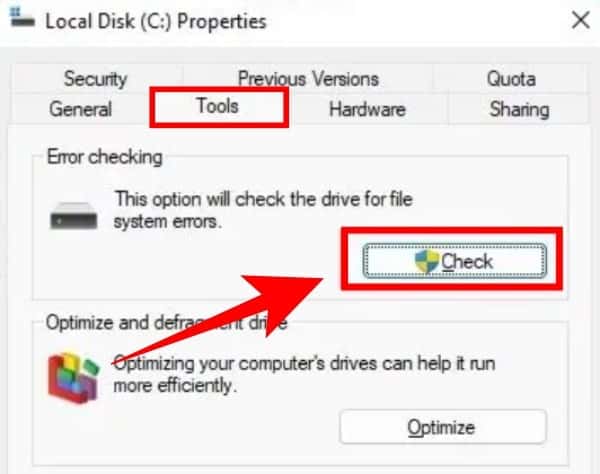
1. Check System Errors In The Disk
- Press Windows + E to run File Explorer in Windows 11. Right-click on the C drive and select Properties. Here, select Tools and then Error checking, then click Check.
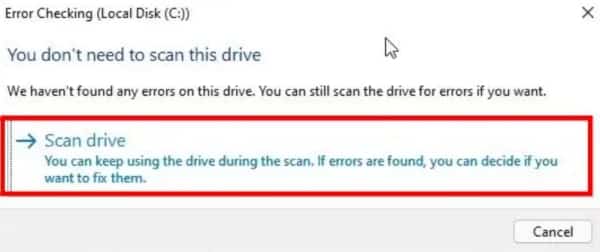
- Next, select Scan drive from the pop-up window. Now, Windows 11 will scan the drive for system faults, and if there are any, it will let you repair the disc.
2. Execute The CHKDSK Repair Command
Try this procedure if the method mentioned above didn’t work to fix disk errors on Windows 11. Windows includes a command-line utility called CHKDSK that can be used to resolve any disk-related issues. How to use the CHKDSK repair command is as follows:
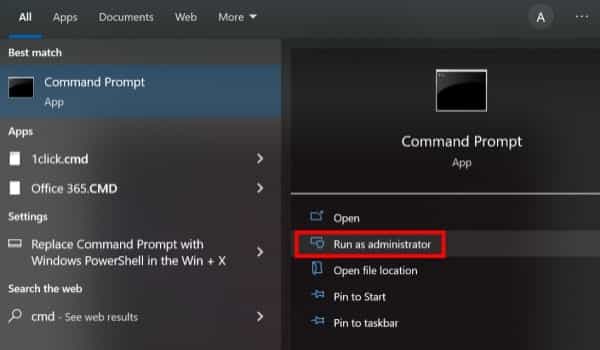
- Type cmd after briefly pressing the Windows key. Now launch Command Prompt with administrator rights by clicking Run as administrator on the right-pane.
- Perform a CHKDSK scan by typing the command shown below and pressing Enter once you are in the CMD window. Your Windows 11 computer will need to restart in order to begin the CHKDSK scan, it will let you know. Input y and press Enter.
chkdsk /f C:
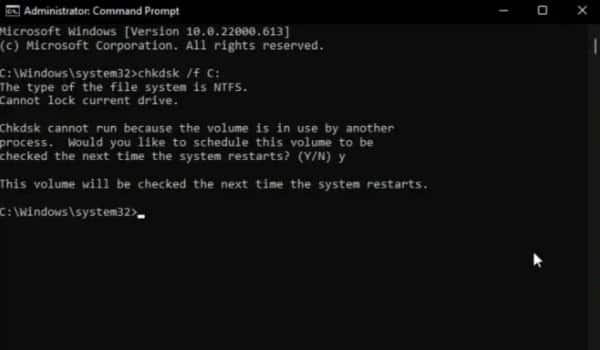
- Go ahead and restart your computer now. Keep calm and wait for Windows 11 to finish the CHKDSK scan, which could take some time.
- Windows 11 will start up automatically after the scan. By pressing the Windows key once and looking for Event Viewer, you may see the results of the CHKDSK scan.
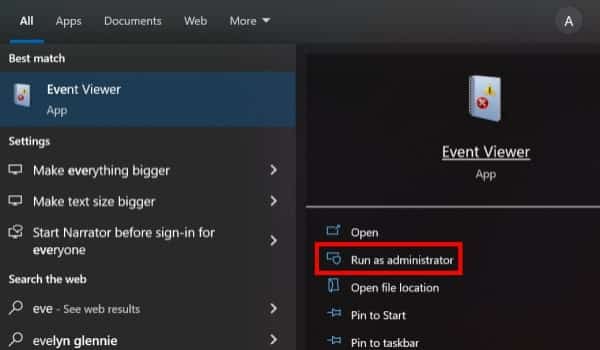
- Open the Event Viewer and navigate to the Application section by expanding the Windows Logs section in the left sidebar. Find the most recent Wininit entry in the Source column by scrolling down in the right pane.
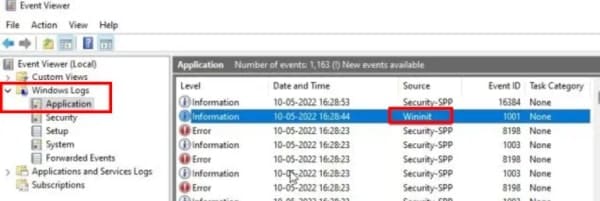
- Check the CHKDSK scan results by opening the Wininit entry. You are good to go if Windows 11 reports that there are no disc errors. Investigate the error further and hunt online for a solution if it displays disc errors.

3. Defragment Hard Disk
Try defragmenting the drive if Windows 11 is installed on a mechanical hard drive. Most fundamental problems with disk errors on Windows 11 are resolved by doing this. Defragmentation is not advised if you are utilizing an SSD. The lifespan of your SSD will be shortened if you do this.
- To start, press the Windows key once and type defragment. Open Defragment and Optimize Drives at this time.
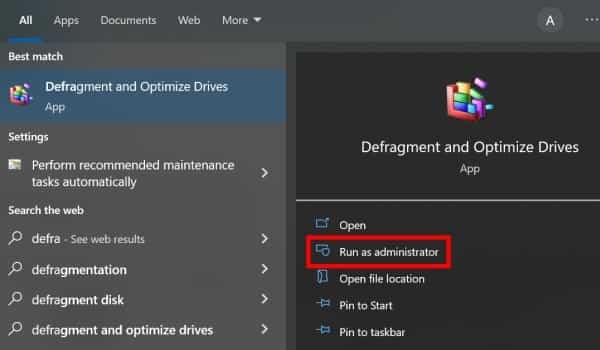
- Select the C drive here, choose Optimize, and then wait for Windows to finish defragmenting the drive.
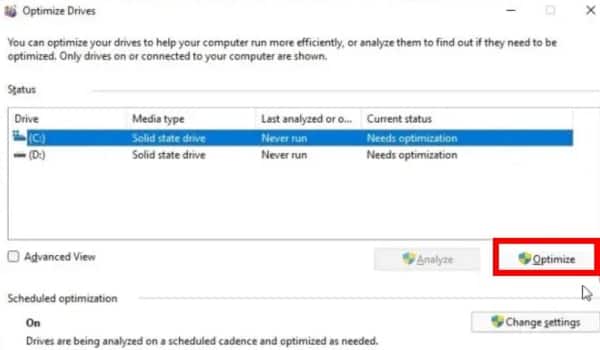
- Restart Windows 11 once the procedure is finished, and the disc errors should be resolved.
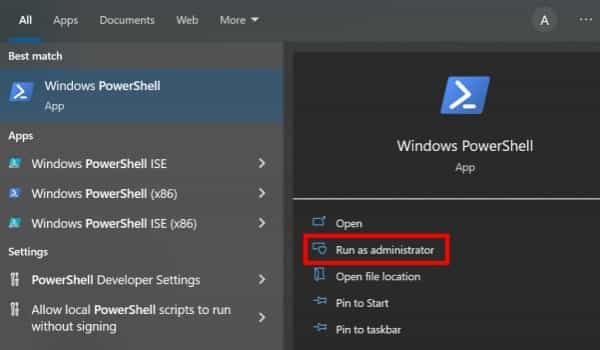
4. Use PowerShell
Try using PowerShell’s Repair-Volume function to fix the disk errors on Windows 11 if you are still seeing them. Using it with Windows 11 is as follows:
- Press the Windows key and enter Powershell. To open the window with administrative rights, click Run as administrator in the right pane.
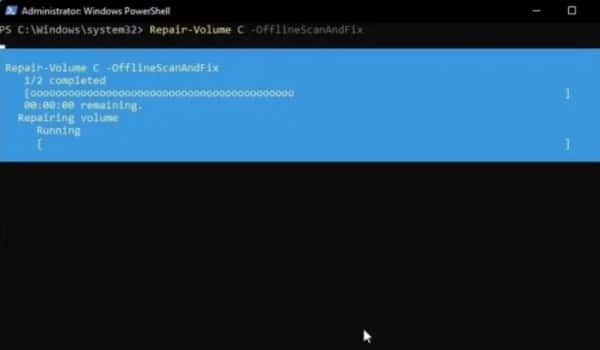
- Copy and paste the following command into the PowerShell window, then press Enter.
Repair-Volume C –OfflineScanAndFix
- Next, execute the command listed below.
Repair-Volume C –Scan
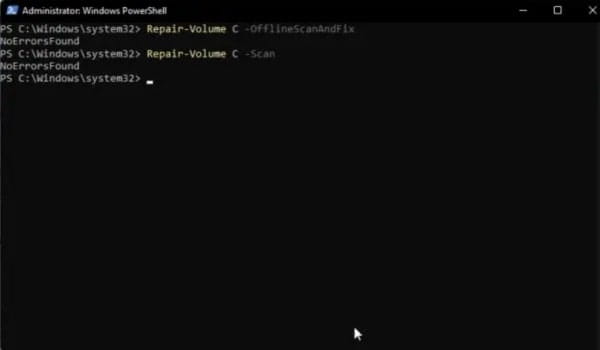
Restart Windows 11 after the repair procedure is finished to see if the disc errors have been fixed or not.
5. Recovery (For PCs Unable To Log In)
You must troubleshoot your Windows 11 computer from the recovery screen if you are frequently encountering the “Windows identified a hard disc problem” or “Repairing disc faults” problems during boot.
- First things first, turn off your computer completely. Turn it on now, then shut it down after Windows starts loading. Now start your computer, then switch it off once more. When you repeat this procedure two or three times, Windows 11 will be compelled to load the recovery screen. You can also try pressing F2, F8, or F12 during startup to open the Startup recovery screen on some PCs.
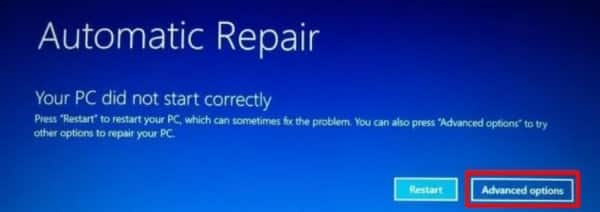
- You will immediately boot into the Recovery screen. Click the Advanced options here.
- Next, go to Troubleshoot and open Command Prompt.
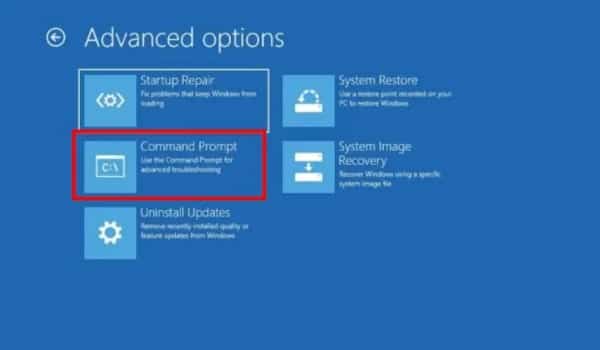
- At this point, a Command Prompt window will appear. Run each of the commands below one at a time. You will be able to log into your Windows 11 computer after these attempts to fix the boot-related files.
bootrec /fixmbr
bootrec /fixboot
bootrec /rebuildbcd
- Restart your computer to see if the problem has been fixed.
6. Boot In Safe Mode (For PCs That Cannot Log In)
You will need to start your computer in Safe mode and carry out some of the aforementioned tasks if the issue of disk errors on Windows 11 is still not fixed. The steps are listed below.
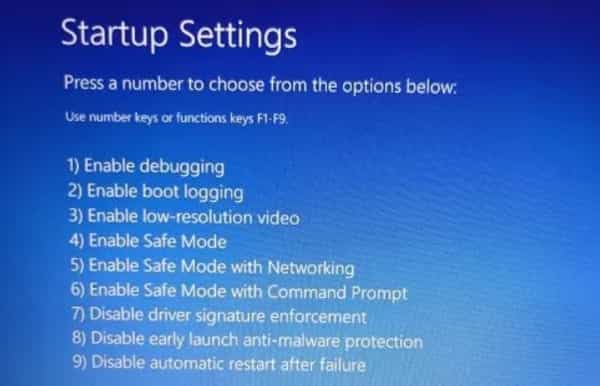
- To start Windows 11 in Safe mode, refer to our tutorial on how to do so. When in recovery mode, press “4” or “F4”.
- Once you arrive here, we advise carrying out each of the methods in this article. Check the disc first for system faults, then perform the CHKDSK scan, and then defragment the hard drive. The PowerShell commands should then be executed to resolve disk-related errors.
- Restart the computer, and the disc errors should be resolved. You won’t have to fix any disc issues in order to log into your computer.
7. Re-install Windows 11 (For PCs Unable To Log In)
Reinstalling Windows 11 might be the best option if nothing else has worked so far. Go to our handy tutorial on how to install Windows 11. The C drive, which contains the files and folders under Desktop, Downloads, Documents, etc, will only be deleted as a result of this operation; other drives will not be impacted.
If you have reinstalled Windows 11 and still experiencing disk errors on Windows 11, the problem may be with the hard drive itself. We advise switching out the hard disc to an SSD for significantly greater speed and durability.
Final Words
These are the seven methods for diagnosing disk errors on Windows 11 computers. If you can still log into your PC, we advise searching for faults, resolving them, and storing up data before a hard drive failure causes problems.